


First Principles Python Part 1
Hello, World!

Writing Your First Python Program
The hardest part of programming is to think like a programmer. Programming requires a combination of problem-solving, critical and analytical thinking, design processes, testing, and structuring and assembling systems through code. Problem-solving is used in everything from mathematics, physics, and engineering to solving word cross puzzles or playing chess. Problem-solving necessitates creative thinking, formulation of problems, and the expression of concise and accurate solutions. It is difficult but so is everything else worth doing. Programming is accessible largely to everyone and requires little mathematical background to grasp its core ideas and start constructing simple but useful programs. Constructing the program itself is similar to following a recipe on how to bake a cake or instructions on building a set of legos. Programs are constructed through sets of instructions, written in a language, that detail how a specific computation should be completed. A computation can include things such as solving a mathematical equation, searching through text for a specific word or processing an image.
Learning a programming language is similar to learning a written and spoken language such as English, learning how to play an instrument such as the violin using sheet music, or solving a math equation using a set of rules. The learning process for all four of these requires using and understanding logical and formal language; grammar for the English language, musical bars and notes for instruments, mathematical notation for equations, and syntax for programming languages. This may seem overwhelming at first, but just like learning to bake your first batch of chocolate chip cookies, it will become easier with plenty of practice and testing out different solutions. Eventually, as you develop fluency and progress your skills, you will be able to start baking more complex cookies such as red velvet with white chocolate chips. You will become more efficient at baking (writing Python programs) being able to produce cookies (maintainable code) at a faster rate with much less error as you continue to write programs every day.
Prerequisites
Please make sure have completed the two prerequisites, Python Installation and Integrated Developer Environments, below before moving on to the next section.
Python Installation
Before you can write your first program you need to ensure that Python is properly installed on your computer. You can check if you have Python already installed on your computer by typing python in a terminal or command prompt.
1. Open up the Command Prompt, a Linux Terminal, or macOS Terminal
Depending on your operating system you will have different command-line interface (CLI) applications for accessing, downloading, deleting, etc. files on your local machine. You will first need to open a CLI application and click into the interface and next to the listed file path: C:\YourFilePathHere>

2. Type python in the CLI
You can check if you have the latest version of Python installed by typing:
python 
3. The Python Version is Outputted in the CLI
You can see the outputted version of Python in the terminal as well as additional terminal commands which provide more information.

If you do not have Python 3.9 or another newer release version installed (3.6 or above), please check out this quick and simple Python installation guide. Once you have followed the installation guide you can check if Python has properly been installed by following the same steps as above. Installing Python and its interpreter is necessary in order to properly execute Python programs and files ending in the .py extension.
Integrated Developer Environment
Even though it is not absolutely necessary, I would greatly recommend installing the free PyCharm Community Edition IDE for Python application and software development, as well as the Jupyter Notebook. If you have not previously installed an integrated developer environment (IDE), please check out this full installation guide and walkthrough here. You may also follow the walkthroughs and tutorials which will be provided in Jupyter Notebooks on Google Colab. To find out more about the functionality of Colab, it may prove beneficial to you to watch this short 6-minute video provided by the Google Tensorflow Team. The notebooks will be linked at the start of a section that requires you to write a program or script. I would recommend typing out each and every piece of the code yourself in your own IDE, instead of just clicking through the notebooks, as it will help to form a greater mind-muscle memory as you practice.
Hello, World!
Now that all of the prerequisites are met and we know about the Python programming language, it is time to write your first-ever Python program. To access the Colab, click here (Not recommended).
“The only way to learn a new programming language is by writing programs in it. The first program is the same for all languages:
Print the words
Hello, World!”
- Brian W. Kernighan and Dennis M. Ritchie
This will be a short exercise to introduce you to the wonderful world of code and engineering. There may be some initial overlap with the second article for setting up your developer environment.
1. Click the PyCharm desktop icon to open the IDE
Once the PyCharm IDE is correctly installed, open the application by clicking on the desktop icon. This should load the application and bring up the IDE in a brief moment.

2. Click the New Project button
Once the PyCharm IDE finishes loading and is running, it will bring you to a ‘Welcome to PyCharm’ screen where you are able to start your first Python project. Click the New Project button in the top right of the IDE.

3. Select Pure Python in the Left-hand Sidebar
The Pure Python tab will be automatically selected when you start a New Project. If the Pure Python tab is not selected or was clicked off of, reselect it to continue. The default new project environment is set to Virtualenv. Virtualenv is an isolated environment where modules and packages can be installed without affecting the system-wide configurations. If you would like to install only a select amount of Python packages or modules, or have a sort of constraint on your local machine, leave the new environment setting as the default Virtualenv. You can leave the Base interpreter version of Python as the default one you installed, or change it to a different version such as 3.8. Name your first project, HelloWorld.

4. The new Python Environment will be created
The newly created Python environment and project will begin to initialize. If everything has been correctly installed, the PyCharm IDE will open the new project files. The project folder and an outline of its file structure will be available in the menu on the left-hand side of the IDE. You can minimize the menu containing the file structure by clicking on the Project tab.

5. Select File and New
Different types of files can be added, deleted, moved, or renamed inside the project and directly from within the IDE. Select the File tab in the top-left corner of the IDE. Next, click the New… sub-tab.

6. Select Python file
A New box will open up. In the New box, select the Python File option.

7. Type in the name of the file and press enter
A New Python File box will open. In the New Python File, type HelloWorld as the name of the file. Make sure that Python File is selected and press enter. A file that ends in the .py extension will be created.

8. The HelloWorld.py file you created will open
You now are able to write code inside of the HelloWorld.py file. The code written inside of files ending in .py can be executed by the Python interpreter.

9. Open up the bottom Terminal Tab
Click the terminal tab at the bottom left-hand side of the IDE to open up the local terminal in the IDE. From the terminal, you have access to do many different things such as run, create, move, or delete files, as well as install or upgrade modules and packages into the environment. To click into the terminal, mouse over the outlined square next to the name of your project folder: \HelloWorld>

10. Write the code inside the HelloWorld.py file
Inside the HelloWorld.py file, on the first numbered line 1, type:
print("Hello, World!")To output data to the terminal, simply write the exact same code above using the print() function. The print() function will be covered in detail later on in a different part. The characters Hello, World! are enclosed in quotation marks signifying that it is a string (Unicode characters made of bytes) to the Python interpreter.

11. Type python HelloWorld.py in the Terminal
Once you are inside the IDE terminal, type python HelloWorld.py. This will run and execute the HelloWorld.py file that you created.
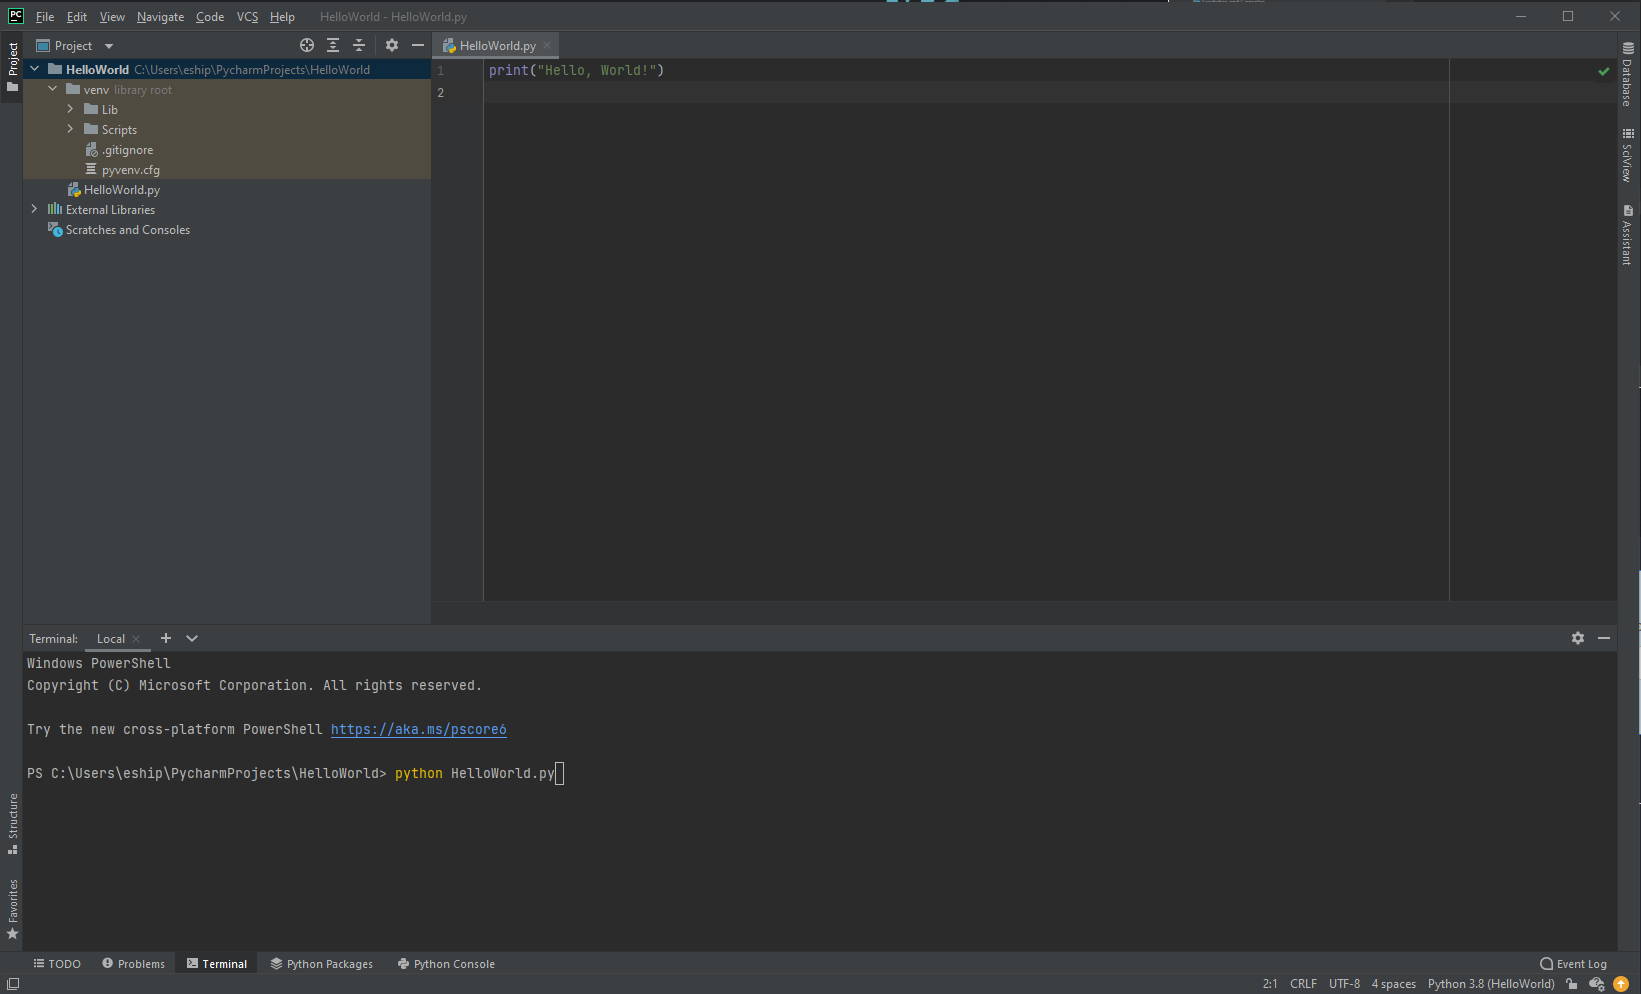
12. The Terminal outputs Hello, World!
The terminal runs the contents of the HelloWorld.py file and will output Hello, World!

13. Click File and Save All to save the program
Select the File tab in the top-left corner of the IDE. Next, click the Save All sub-tab.

The Practice of Python Programming
You have just accomplished something of great significance and achievement. You created a Python program, wrote code in a .py file, successfully compiled your program without error, and outputted the text “Hello, World!” to the terminal. As you progress through your Python programming journey, you will continue to build on top of these initial concepts covered here until you can create robust, test-driven, and fully functional applications. The most important thing you can do to benefit your learning going forward is to practice programming daily with vigor.
Next Part
First Principles Python Part 2
Learn about naming conventions, initializing and assigning variables in Python here.
Previous Part
First Principles Python Part 0
The previous part, a brief introduction to one of the most popular programming languages in the world, Python, can be found here.
Additional Articles on How to Setup your Developer Environment
I would recommend starting here and installing an integrated development environment (IDE) for Python, as it will make managing your code or projects significantly easier. Popular IDEs are PyCharm, Visual Studio Code, Google Colab, and the Jupyter Notebook.
Integrated Developer Environments Part 1
Integrated Developer Environments Part 2
Anaconda Installation Guide
Python Installation Guide
If you found this article to be useful please share it with your peers.
Or follow me on social media: